 Sometimes I throw my kids a challenge that might seem a little unreasonable. "Let me show you how to build a Google Site from a blank template. I've got about 10 minutes to show you some things you need to know or might want to try. Then you have 30 minutes to design - that's it." But that's exactly what we did today. I pre-made the 4 google sites that students would be working on today. (1 for each group of 4 students) and shared it with all group members as owners. I had done it the night before and had been getting emails ever since it hit the students' inbox as they were excited to get started. The sites were simple, boring and if my students had anything to do with it, about to be transformed to look nothing like that ever again. After showing my students this site, I showed them my professional site I had just created a few weeks prior. This was done to give them a sample of what they would be doing without showing them an exact site they could replicate about ecosystems. They had seen it before as I had asked them for their feedback on it, but this time it was good for them to see a before and after type demonstration. In addition, I find my students like to see that I have done or am doing the same thing they are as it helps to remove the divide between teacher vs. student. The first thing I suggested the students did was to choose 2-3 colours as their theme for their site. It was important that the students thought about the content that would be put on their course, colours that complemented each other and represented the group as they wanted to be seen. One group was very specific in asking for a site to match colours and I provided them with https://color.adobe.com and http://paletton.com as reference points. I even had one group create a colour swatch with their 3 colours in an image with the hex#'s as a reference point for the entire team and utilised them to customise other fonts later. Most groups chose colours that worked well together. From there it was time to make the site look better than it did. Most teams split in half to conquer site design/layout and creating the header in pairs. The header was an important part of the site for the students as it would be on their site no matter where they were on their site. There were lots of options for creating headers - Google Drawing, Pages, Canvas, but most went to the internet to find an initial image that inspired them. This was in and of itself an important lesson in how to search. After searching for an image, I suggested to students they selected 'Search Tools' and then 'Usage Rights' where they could select images that were 'labelled for reuse with modification'. After students had selected their image and saved it to their desktop, they could open it in Preview and adjust the size from the Tools drop-down menu. We did our best to resize the image into an appropriate header size. Some additional features at this point such as text. Then it was off to https://pixlr.com/ to use Pixlr Express. As we are a Google Apps For Edu school, we chose to go to our Drive, select new, connect more, connect more apps and choose to connect Pixlr Express to our drive. From there, students had the option to make adjustments, add text, stickers, overlays and effects to create a header that suited their particular taste. Here are a few they came up with. Most teams tried quite a variety of options and ideas before settling on the headers you see here. These were easy to insert as a header and we also removed the logo from the site design. The other team members were in charge of the look of the rest of the page, while still communicating with their team as a whole to create a cohesive project. The students had to make a number of tabs for their different lessons/ levels within their courses. They could choose from a horizontal navigation or a sidebar navigation. It was unanimous that the horizontal navigation was the preferred choice by the student. Once the header and tabs were in place, the students could just really begin to play around with the overall design. I showed my students how to manage the site using themes, colours and fonts. Many became fascinated in ways they could change the hover colours, spacing and shape of the tabs, colours of different sections and adding images. There was a lot of engaging discussions going on along the way such as debating colour choices, the alignment of tabs, and if the picture of a puppy as a header was the best choice of the unit. As I walked around and also met with groups to check in on their progress, it was wonderful to just be able to respond with a question and allow the students to think about their designs. Sometimes they made smart decisions when they reflected on the question asked and sometimes they made design choices I disagreed with. But in the end, the work was their own. Never telling them no you can't do that, but rather allowing them to rethink their choices in design allowed them to collaborate more to come up with a final product they were proud of. Honestly, I was amazed. Less than 30 minutes and this kind of design work was produced as a collaborative team of 4 with all students engaged and eager to do more. Can't wait to see what they do once they start putting some content into their sites soon. 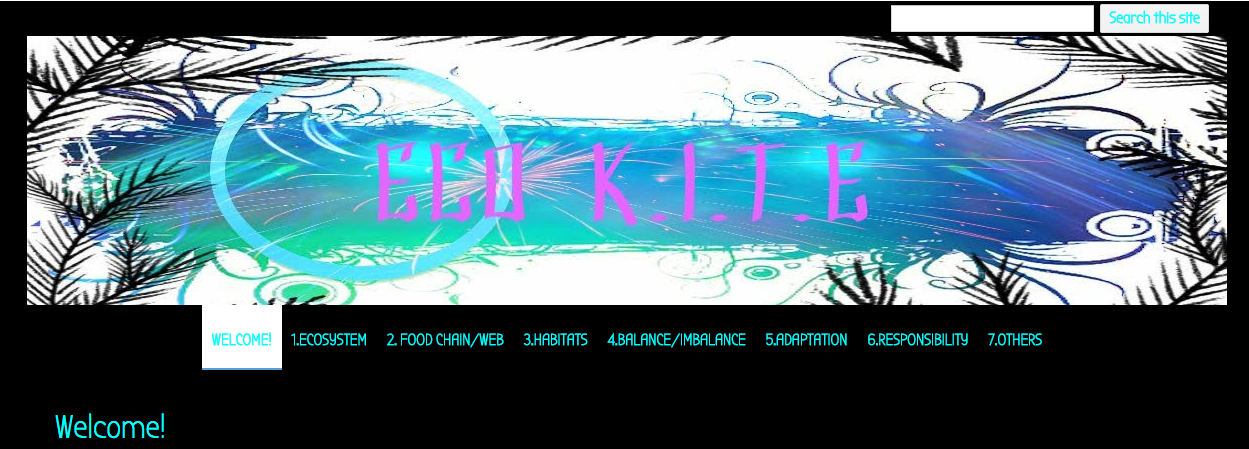
0 Comments
|
Archives
February 2019
Categories
All
|
 RSS Feed